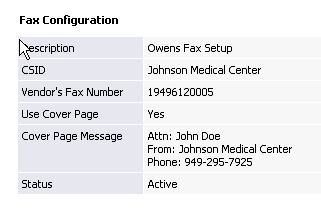
§ Select Setup Tab then Vendor Tab.
§ Select the Vendor from the list or use the Vendor Search Menu on the left navigation bar.
§ Select the Fax Tab for that vendor.
§ Select the Add Configuration Link.
§ Now, add a description for the auto-fax, input your organization name as the CSID (see below) and add the vendor’s fax number.
§ A cover page is optional and can be turned off at any time.
§ The fax configuration will be defaulted to all facilities. If you want the fax number to be used for a specific facility, you will need to select a facility from the dropdown.

![]() The user who transmits the PO will receive a confirmation of delivery or failure to their dashboard. Users, who have at least view access to the purchase order menu, can view the fax confirmation status link displayed on each faxed PO.
The user who transmits the PO will receive a confirmation of delivery or failure to their dashboard. Users, who have at least view access to the purchase order menu, can view the fax confirmation status link displayed on each faxed PO.
Here is the list of dashboard notifications for Auto-faxing:
1. Fax Sent Successfully - Fax was delivered with no problems. (Received confirmation)
2. Fax Status Notification – Fax was not sent because of a problem like an invalid fax number. (Confirmation confirming invalid number)
3. Fax Failed – Fax didn’t reach the faxing service because the faxing service was down or the server wasn’t available.
Click here to see Frequently Asked Questions.